Author Topic: The DEMONX 1970 vert project Pt2  (Read 94067 times)

0 Members and 2 Guests are viewing this topic.

Offline Scott

  • Tri Powered
  • ****
  • Posts: 419
  • Shed Dweller
  • Location: Gold Coast
The DEMONX 1970 vert project Pt2
« Reply #20 on: July 23, 2009, 12:34:43 PM »
Sounds like you are having as much fun with the paint as I am trying to get the right amount of end play with my new rear wheel bearings.  One is spot on, the other is way off :24

Offline demonx

  • Fuel Injected
  • *****
  • Posts: 722
The DEMONX 1970 vert project Pt2
« Reply #21 on: October 11, 2009, 02:40:07 PM »
Starting to get back to bare glass. Pic taken yesterday 10/10/09

Offline demonx

  • Fuel Injected
  • *****
  • Posts: 722
The DEMONX 1970 vert project Pt2
« Reply #22 on: October 11, 2009, 04:33:02 PM »
One side nearly done. Just got to work out a good way to sand in all the little nooks and crannies - pic taken 11/10/09


Offline mick

  • Tri Powered
  • ****
  • Posts: 489
The DEMONX 1970 vert project Pt2
« Reply #23 on: October 11, 2009, 04:53:52 PM »
I remember that stage I feel your pain....

Re:- Sanding tight places, prepare to lose all the skin of the tips of your fingers....

Offline demonx

  • Fuel Injected
  • *****
  • Posts: 722
The DEMONX 1970 vert project Pt2
« Reply #24 on: October 21, 2009, 07:00:39 PM »
Since the fibreglass guys booked into come round tomorrow for the body work I figured I better pull my thumb out and get a bit more prep done.

I dropped off a heap of small parts to be soda blasted like all the egg grills, wiper door and wiper door grill the chrome window corner pieces near the wiper door. Also the rear deck grills, petrol lid door and the headlight surrounds.

While I as there I asked them blast the wheel carrier very lightly as I didn't want to risk thinning it too much (they used garnet on this) ...


Will get the damage (bottom of pic) glassed up tomorrow

Also got them to blast the rear filler panel while I waited. It looks like a bloody jigsaw puzzle with all the cracks and bog.

Still deciding whether to get this repaired tomorrow or if it'd be cheaper to order a brand new one. I have about 14 hours to make my mind up and I'm hoping to be asleep for at least half those!


Will post more pics when I get the soda blasted pieces back.

Offline MR 502

  • Four Barrel
  • ***
  • Posts: 93
The DEMONX 1970 vert project Pt2
« Reply #25 on: October 21, 2009, 08:36:31 PM »
Hi Demonx, I have a new rear filler panel that i don't need.
Give me a call if you want it.

Warryn 0415416619


Offline demonx

  • Fuel Injected
  • *****
  • Posts: 722
The DEMONX 1970 vert project Pt2
« Reply #26 on: October 22, 2009, 11:39:19 AM »
Warryn (Mr 502) - was good to chat with another forum member last night.

Thanks for the offer on the filler panel, more than fair price too, as we spoke about last night I discussed with fibreglass guy today about repairing my panel and he quoted me $130 to fix the existing panel. I may as well do that and keep the original panel. Thanks again.

Heres an action shot of the Mother and son team.

You can see in this pic the while rear seam repair. The antenna and luggage rack holes. The hole cut (they fixed it up more later on before laying mat) for the left door mirror, theres heaps more rear end work but you cannot see it in this pic.
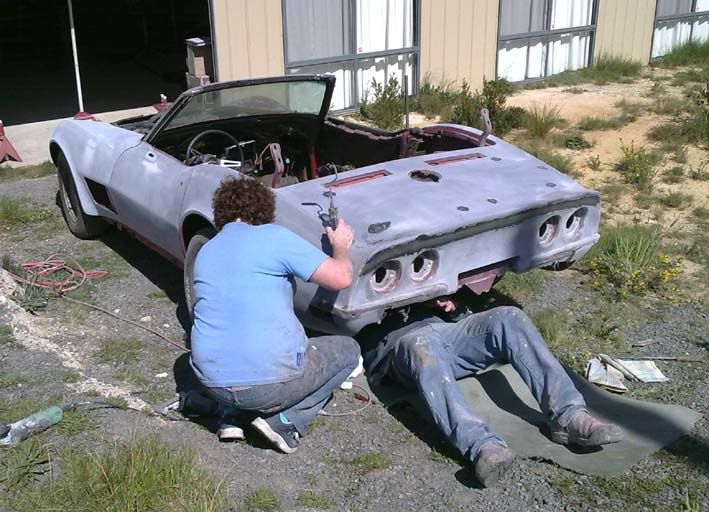


From what I gather the family has been in the trade for pretty much forever, the son I'm guessing is around 40yo and he'd grown up in the trade. He now runs the business. I asked if he's done Vettes before and he said probably only about a dozen.

For anyone the interested in the method/tools he's been using a diamond grinder to cut and grind the holes for the patch, a strip sander (kinda like a belt sander on a wand) for other tight spots and just plain old fashioned paper for the real tight spots. Cleans back the spot with acetone and then applies the repair. Using both a paint brush or a roller (you can see her holding it in the pic) they layer in the mat and then I noticed after they have packed it in (or whatever you call it) they brush a heap of the resin mixture over the top. They're using vinylester and not polyester.

Patching where possible from both inside and outside with matting. for other repairs that don't require mat he also has a mixture which he makes himself out of their scrap fibreglass and some other stuff that he reckons they use because there's nothing better on the market so they make their own.

Will take more pics later on when more work is done.
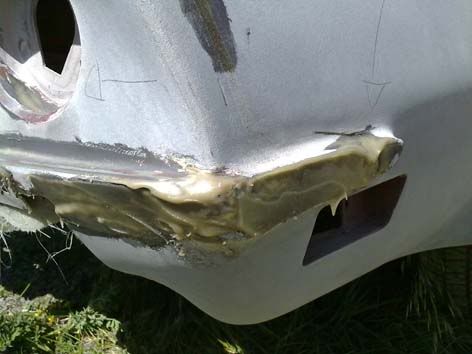


Repairs like this one he's doing in stages. I asked him to strengthen the bumper mounts, so he's layered in a heap of mat to the inside to give it support. You can see here that he's done the inside but not working on the outside so much yet. He said he's waiting for all this to cure so he can grind it back this afternoon to do the outside repair.

I also asked him about time until it's cured enough to spray sealer onto. I mentioned to him that a vette expert (chromie) suggests three months. His reply was that the stuff is touch dry in an hour. Partially cured in 24 hours. Should be safe to seal after a couple weeks according to manufacturer specs but then he also said the longer you wait the better and it's all a matter of personal choice and everyone has a different opinion... He's going to call up the manufacturer for me and get a "correct" answer but I have a feeling I'll be waiting the months just to play it safe.

Offline demonx

  • Fuel Injected
  • *****
  • Posts: 722
The DEMONX 1970 vert project Pt2
« Reply #27 on: November 02, 2009, 02:51:57 PM »
More baby steps:


Heat gun and paint scraper to take off the top layers of paint then sand back to bare glass.


Offline demonx

  • Fuel Injected
  • *****
  • Posts: 722
The DEMONX 1970 vert project Pt2
« Reply #28 on: November 07, 2009, 01:11:11 PM »
A couple more body work progress pics.


Offline Scott

  • Tri Powered
  • ****
  • Posts: 419
  • Shed Dweller
  • Location: Gold Coast
The DEMONX 1970 vert project Pt2
« Reply #29 on: November 08, 2009, 11:45:49 AM »
Quote from: demonx link=topic=7212.msg1045936259#msg1045936259


So, you have patched the spot where the rear vision mirror goes? Are you intending to put a mirror on each side as I thought it was needed for a LHD car on the road?

Either way, looks like everything is coming along nicely.

Offline demonx

  • Fuel Injected
  • *****
  • Posts: 722
The DEMONX 1970 vert project Pt2
« Reply #30 on: November 08, 2009, 09:26:41 PM »
Quote from: Scott
So, you have patched the spot where the rear vision mirror goes? Are you intending to put a mirror on each side as I thought it was needed for a LHD car on the road?


When I removed the crappy plastic aftermarket mirrors there was half a dozen holes underneath where bubba had fitted or made multiple attempts at fitting different mirrors.

So I had the fibreglass guy grind it back and reglass the area so i can redrill only two holes for the brand new chrome corvette mirrors I bought from Willcoxcorvette.com - they come with a template so I can get the spot perfect first shot. I even had a test run using the template and drilling the holes before I had the sections reglassed.


Offline Reklaw

  • Four Barrel
  • ***
  • Posts: 189
The DEMONX 1970 vert project Pt2
« Reply #31 on: November 09, 2009, 07:38:16 AM »
Hi Demonx. On my '75, with the RH mirror mounted in the standard position, I found that it couldn't be adjusted so I could see properly (LHD Car). One option was to mount the mirror further forward, but that would look a bit strange as the LH mirror was in the standard position. The other was to grind away some of the housing on the mirror stem (of my brand new mirror) to allow it to swivel a bit further. The bare metal was then painted with clear Engine Enamel to stop corrosion.
You may come across the same problem.
Bob Walker
Long Jetty

Offline demonx

  • Fuel Injected
  • *****
  • Posts: 722
The DEMONX 1970 vert project Pt2
« Reply #32 on: November 09, 2009, 06:54:10 PM »
UPDATE:

NOT HAPPY

Was out the shed today doing something else and a odd looking mark on the windshield caught my eye.

Yep - my brand new, never been driven on the road windshield is already cracked. I am so p#issed off.

No idea how it happened. I know it was not like it when installed so I can't blame them. It's happened sometime over the last day or so - thing is no-one goes near the car except me. Nothing is stored close to it that could have fell. I'm way out of ideas. No one to blame.

Offline gtc

  • Supercharged
  • ******
  • Posts: 1466
  • Car: 1970 454 Manual
The DEMONX 1970 vert project Pt2
« Reply #33 on: November 09, 2009, 08:07:39 PM »
Quote from: demonx link=topic=7212.msg1045936281#msg1045936281
UPDATE:

NOT HAPPY

Was out the shed today doing something else and a odd looking mark on the windshield caught my eye.

Yep - my brand new, never been driven on the road windshield is already cracked. I am so p#issed off.

No idea how it happened. I know it was not like it when installed so I can't blame them. It's happened sometime over the last day or so - thing is no-one goes near the car except me. Nothing is stored close to it that could have fell. I'm way out of ideas. No one to blame.


What a bummer!

Is it small enough to be fixed by those windscreen crack repair guys?
It's C3 chromie for me, see? Si!

Offline demonx

  • Fuel Injected
  • *****
  • Posts: 722
The DEMONX 1970 vert project Pt2
« Reply #34 on: November 09, 2009, 08:18:41 PM »
Quote from: gtc

Is it small enough to be fixed by those windscreen crack repair guys?


It's curved and around 15cm long. Not really repairable.

I'll leave it as is - get the damn car on the road at some stage and worry about it after that. One windshield replace in the build is enough for me let alone getting a second.

Offline sirfixalot

  • Fuel Injected
  • *****
  • Posts: 701
  • Committee Member & Tech Adviser C3-C4
  • Location: Gods Country Sutherland S
The DEMONX 1970 vert project Pt2
« Reply #35 on: November 09, 2009, 08:19:53 PM »
Did you have a light near it ? I had a 150w spot light above the car to see what I was doing it dropped down onto screen & put about 3 cracks in top layer of glass. Same deal noticed a mark on screen thru the dust

Offline silver1

  • Four Barrel
  • ***
  • Posts: 69
The DEMONX 1970 vert project Pt2
« Reply #36 on: November 09, 2009, 11:16:14 PM »
does the crack come from an edge ?

Offline demonx

  • Fuel Injected
  • *****
  • Posts: 722
The DEMONX 1970 vert project Pt2
« Reply #37 on: November 10, 2009, 06:22:31 AM »
No lights at all -

Yes the crack comes from the lower edge in the right lower corner. I've obviously bumped it with something but no idea what/how.

Just have to get over it and keep going I guess. I'll deal with it after the cars on the road unless the engineers pick on it.

Offline silver1

  • Four Barrel
  • ***
  • Posts: 69
The DEMONX 1970 vert project Pt2
« Reply #38 on: November 10, 2009, 01:06:20 PM »
I would call the guy back out to have a look, if nothings hit the screen it could be a fault in the glass.

Offline Thunder Kiss

  • Four Barrel
  • ***
  • Posts: 229
    • http://photobucket.com/albums/v290/ThunderKiss/
The DEMONX 1970 vert project Pt2
« Reply #39 on: November 10, 2009, 02:54:04 PM »
Does your insurance policy cover you for 1 free windscreen per year?