Author Topic: The DEMONX 1970 vert project Pt2  (Read 68992 times)

0 Members and 7 Guests are viewing this topic.

Offline 72vet

  • Supercharged
  • ******
  • Posts: 1676
The DEMONX 1970 vert project Pt2
« Reply #80 on: July 21, 2010, 05:33:39 PM »
Looking great demonx, any pic's of the rear :pepper:
CLICK ME to see my albums.

Offline demonx

  • Fuel Injected
  • *****
  • Posts: 722
The DEMONX 1970 vert project Pt2
« Reply #81 on: July 21, 2010, 11:39:48 PM »
Quote from: 72vet link=topic=7212.msg1045937565#msg1045937565
Looking great demonx, any pic's of the rear :pepper:


I did take some - I'll have a look and upload them tomorrow if I remember.

Offline Scott

  • Tri Powered
  • ****
  • Posts: 419
  • Shed Dweller
  • Location: Gold Coast
The DEMONX 1970 vert project Pt2
« Reply #82 on: July 22, 2010, 12:13:29 PM »
Is there a 'before' pic of the door gaps?  Looks pretty right now.  

I too have been slack of late.  It's a little too cold out in the shed at night, so I have been using that as an excuse :mmm:

Offline demonx

  • Fuel Injected
  • *****
  • Posts: 722
The DEMONX 1970 vert project Pt2
« Reply #83 on: July 22, 2010, 12:54:00 PM »
Quote from: Scott link=topic=7212.msg1045937572#msg1045937572
Is there a 'before' pic of the door gaps?  Looks pretty right now.  


I've just been loking through my pics and I wish I did take before pics of the gaps. They are pretty good at the front of the door but the rear of the doors were shocking. The doors were twisted and it took my brother and myself quite a while to twist them back as straight as we could get them.

This is the best pic I could find and it really hides how bad they were!


The below pic is the only one I could find that showed the rear end in full epoxy. A lot of work has been done since this pic though. I should be taking more pics of all this stuff. When I get out thee and start working pics are the last thing on my mind considering how hard it is to motivate myself to get out there in the first place!


The rear filler panel and the edge where it mount had pretty big gaps (I filmed a video clip of it and will try to upload it to youtube) ... You can see in this pic where I've fiberglassed a patch to the inside of the guard and then I've done the same to the filler panel to make up the gap.


This is the same PPG filler I used on the door gaps and the rear end. Its especially for fibreglass. After I rubbed it all back I spent ages sculpting the gap space and shape but I forgot to take pics after I finished! I'll try to remember next time I'm out there! I'm pretty happy with the end result except need a small bit of work on the right hand edge still where the fibreglass patches are.

Offline demonx

  • Fuel Injected
  • *****
  • Posts: 722
The DEMONX 1970 vert project Pt2
« Reply #84 on: July 22, 2010, 01:14:30 PM »
Not sure if this embedded file will work, but it's a short clip of the shockingly bad filler panel gap prior to repair


[youtube]cr554FQJb7U[/youtube]

I also put a couple other video clips on youtube as well. Will be taking more from now on.


Offline demonx

  • Fuel Injected
  • *****
  • Posts: 722
The DEMONX 1970 vert project Pt2
« Reply #85 on: July 23, 2010, 05:58:28 PM »
Spent a heap more time on the rear end today fixing up some sloppy work I'd done. I'm still not happy with it and need to go back later and do a few tiny things.

It's a real pain in the butt trying to get the lines back into the rear taillight surrounds. When I started it was all cracked bog that I had to remove with a heat gun. I prob should have just bought a new rear end and glassed it in! Would've been so much quicker/easier.


Offline 69 DIRTY RAT

  • Supercharged
  • ******
  • Posts: 1170
    • http://www.ratpackmuscle.com/
The DEMONX 1970 vert project Pt2
« Reply #86 on: July 23, 2010, 08:42:17 PM »
Your doing some nice work there demonx!
http://ratpackmuscle.com/ SCARY TOUGH MUSCLECARS

69 540ci, 755HP 734FtLb RAT, 629rwhp

*I LUV MY '69 ZL-1 540ci VETTE, AND SO DOES YOUR GIRLFRIEND!                   

Offline demonx

  • Fuel Injected
  • *****
  • Posts: 722
The DEMONX 1970 vert project Pt2
« Reply #87 on: August 30, 2010, 04:47:43 PM »
Over the last couple weekends I've got my butt out there again trying to finish off the door gaps and some other little marks on the rear quarters.

This time I took a couple of "before pics".

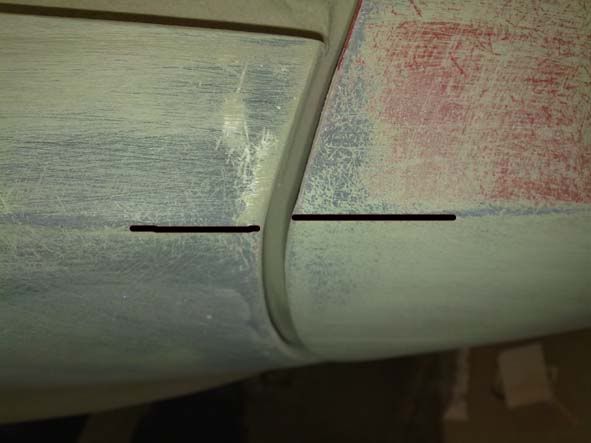
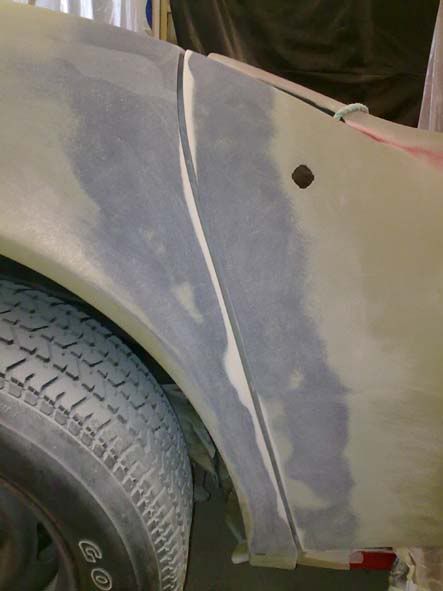
Even though the doors were lines up the best I could so the biggest percentage of the door was inline, the top line was out by a mill or two. You can see in this first pic.


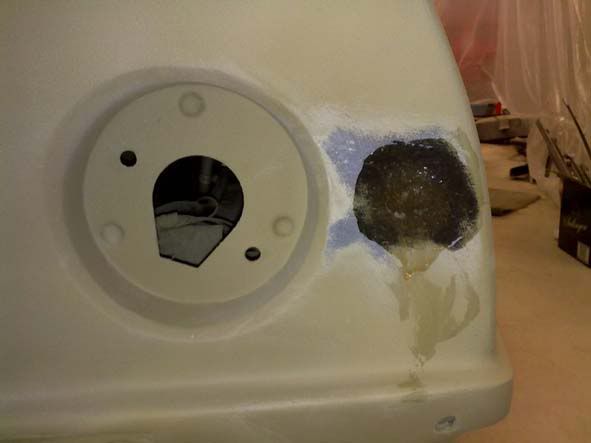
Also even though the majority of the door gap was good you can see in this pic the edge needed just a little bot of help.


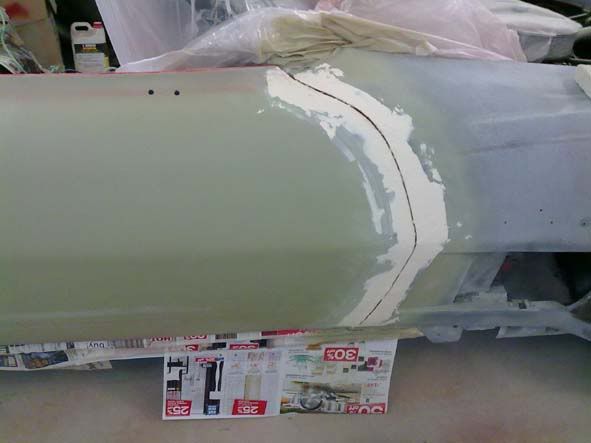
After sanding it back with 80 grit so theres something for the PPG fibreglass filler to grap onto I spread a generous amount across the area.


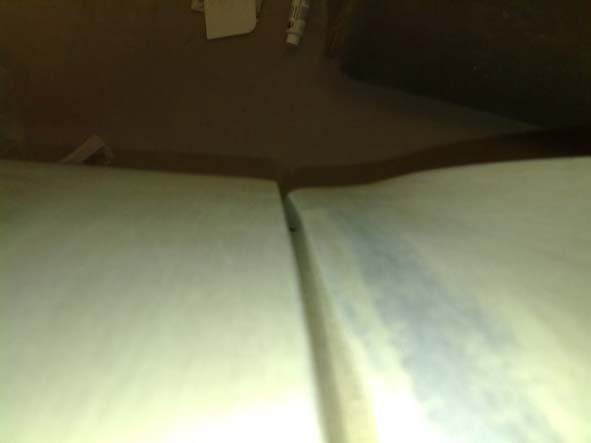
Then block sand it back to this:


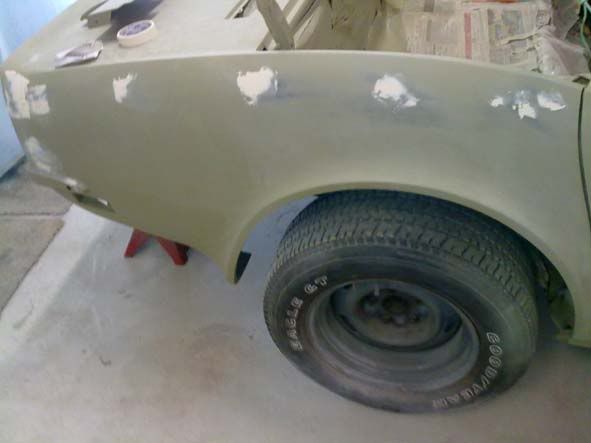
The fronts didn't really need doing, but I figured I'd give them the same treatment just in case there was anything not quite visable to the eye.


You can see in this pic the fronts were no-where near as bad as the rear.


Just hitting a few spots that need some extra attention before the whole area gets a spray with thick primer which I'll block back.


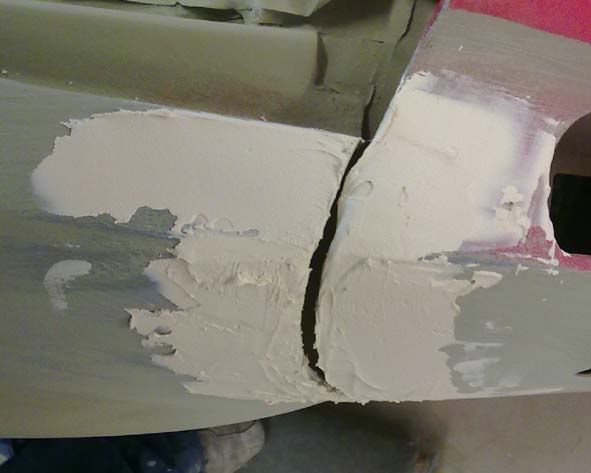
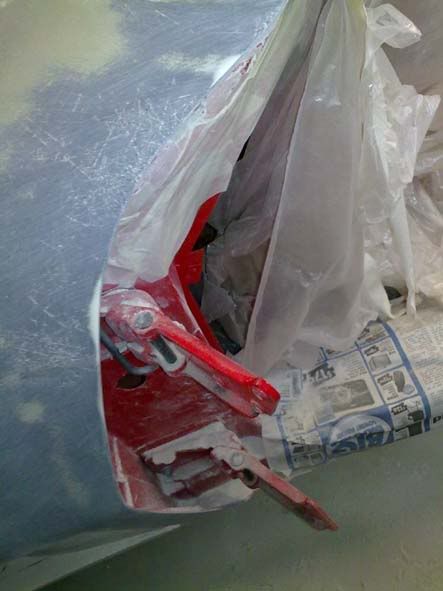
When I was doing the rear quarter panels I noticed a bit in the back that I'd forgotten to go back and finish. It was a section where the fibreglass had gone brittle, so instead of bogging over it I grinded it out and made a fibreglass patch.

Offline demonx

  • Fuel Injected
  • *****
  • Posts: 722
The DEMONX 1970 vert project Pt2
« Reply #88 on: September 13, 2010, 11:35:22 PM »
Ok, so I finished all the body work on the rear end.

Yesterday I block sanded the complete rear from door to door, sprayed a layer of epoxy (to help adhesion) and then left it for an hour or so before spraying a couple coats of poly filler.

Well - here is were I ran into some trouble. I had read and re read the tech sheet for the P.E Filler spray. It said 30 to 45 psi with  a tip size of 2.0 to 2.5

So I mix up a full tin of the P.E. spray as most high b fill products I've used before have a very crappy coverage ratio, so I figured I'd use a full tin easily, then while that's activating I build up my gun with a 2.5 tip and give it a test spray. Seems fine for a sec and then I realise this stuff cannot get through the 2.5 tip, I needed something bigger. Made a rush phone call to my brother and the biggest tip he had was also 2.5, but he had a 3.5 needle but no cap or tip to match it.

Heres where we got dodgy! We got a old scrappy tip, drilled it out to 3.25 then drilled a old crappy cap out to 3.5 and gave a test spray with water. Seemed to seal, seemed to make a fan.

So I rush home and spray the back end of the car with the dodgiest spray gun ever. If you think you've seen bad spray jobs you ain't seen nothing! This gun was splattering like crazy but I managed to lay out two thick coats ready for a guide coat and to block right back ready for primer and color. Wont be too long now.

Offline demonx

  • Fuel Injected
  • *****
  • Posts: 722
The DEMONX 1970 vert project Pt2
« Reply #89 on: September 18, 2010, 03:48:38 PM »
Heres the P.E. Polyester spray. It's a PPG product (not a primer) that I'm using as a high fill instead of using a high fill primer. This way I can block the crap out of it and not have a crappy high build primer on my car. This will be guide coated and blocked, then sprayed with a prima primer. Yes it's more layers and more work, but it's the process that PPG tech department recommend for a Corvette.


Heres a heavier than normal guide coat layer. It's some cheap 2k that I picked up 4lt of for next to nothing as the color was mixed wrong, so I can waste it and not feel the pinch in the wallet! Since the Orange is a nice contrast to any primer colors it's perfect for me to spray on a full layer and use it as a guide coat for my final block sand. For anyone that doesn't know what a guide coat is, you spray a color over your primer before you block sand and anywhere that you see color left you know it's not sanded properly yet which helps you to eliminate grooves and pits and all sorts of things that you don't notice and that will look horrible once the color and clear is on the car... Normally it's just a mist of color, but sometimes if it's just a mist you can still miss areas and since a corvette has so many curves and since I've done so much fibreglass repair work, I don't mind using a full coverage for a guide coat just to be sure I get everything as smooth as I can.


Offline Scott

  • Tri Powered
  • ****
  • Posts: 419
  • Shed Dweller
  • Location: Gold Coast
The DEMONX 1970 vert project Pt2
« Reply #90 on: September 20, 2010, 12:40:59 PM »
I bet you were just excited about spraying colour, even if it was the wrong colour. Good to see work progressing :)

Offline demonx

  • Fuel Injected
  • *****
  • Posts: 722
The DEMONX 1970 vert project Pt2
« Reply #91 on: September 20, 2010, 01:46:45 PM »
Quote from: Scott link=topic=7212.msg1045937827#msg1045937827
I bet you were just excited about spraying colour, even if it was the wrong colour. Good to see work progressing :)


Yeah - till I found out yesterday that this particular orange cloggs up sandpaper more than any paint I've ever encountered! Won't be spraying a thick coat of that again.

Offline Jethro

  • Camo's nemesis
  • Supercharged
  • ******
  • Posts: 1649
  • The Lone Ranger
  • Location: The Gong
  • Car: 1969 Corvette Roadster
The DEMONX 1970 vert project Pt2
« Reply #92 on: September 20, 2010, 06:57:13 PM »
Quote from: demonx link=topic=7212.msg1045937828#msg1045937828
Quote from: Scott link=topic=7212.msg1045937827#msg1045937827
I bet you were just excited about spraying colour, even if it was the wrong colour. Good to see work progressing :)


Yeah - till I found out yesterday that this particular orange cloggs up sandpaper more than any paint I've ever encountered! Won't be spraying a thick coat of that again.


Bummer!:mad::mad::mad::mad:

Offline demonx

  • Fuel Injected
  • *****
  • Posts: 722
The DEMONX 1970 vert project Pt2
« Reply #93 on: September 21, 2010, 01:44:28 PM »
In another turn of events:

I'm getting closer to pulling the motor, I've been thinking of taking Dirty Rats advice and turning this thing into a rat rather than a mouse. I called an engineer this morning and the largest donk he'll ticket me for is a 502ci. Must be fate as I was actually thinking of a 502 before I called him.

At the moment it's a L46 with a M21 muncie 4 speed.

Im thinking of:

502 with a 4 speed semi auto (ie a auto that is full manual shift)

With the 502 I'd have to change the hood so I'd prob be looking at a L88 long hood and do away with the wiper door and grill.

I've never though about semi auto's before but the HQ ute I recently bought has a 350 chev with a full manual powerglide and it's damn fun to drive but a couple more gears would be great!

I still have several months till decision time but thats where I'm sitting at the moment..

Offline gtc

  • Supercharged
  • ******
  • Posts: 1465
  • Car: 1970 454 Manual
The DEMONX 1970 vert project Pt2
« Reply #94 on: September 21, 2010, 02:28:29 PM »
Quote from: demonx link=topic=7212.msg1045937831#msg1045937831

Im thinking of:

502 with a 4 speed semi auto (ie a auto that is full manual shift)

With the 502 I'd have to change the hood so I'd prob be looking at a L88 long hood and do away with the wiper door and grill.


So, you're no longer broke! :wink:
It's C3 chromie for me, see? Si!

Offline Jethro

  • Camo's nemesis
  • Supercharged
  • ******
  • Posts: 1649
  • The Lone Ranger
  • Location: The Gong
  • Car: 1969 Corvette Roadster
The DEMONX 1970 vert project Pt2
« Reply #95 on: September 21, 2010, 04:49:50 PM »
Quote from: demonx link=topic=7212.msg1045937831#msg1045937831

With the 502 I'd have to change the hood so I'd prob be looking at a L88 long hood and do away with the wiper door and grill.

I've never though about semi auto's before but the HQ ute I recently bought has a 350 chev with a full manual powerglide and it's damn fun to drive but a couple more gears would be great!

I still have several months till decision time but thats where I'm sitting at the moment..


Ah! The age old delima of where do I stop comes to mind.... if it wasn't for the money I'be be going for a 454 crate motor straight out of the states....:grr::grr::grr::grr::grr:

Offline demonx

  • Fuel Injected
  • *****
  • Posts: 722
The DEMONX 1970 vert project Pt2
« Reply #96 on: September 21, 2010, 11:24:55 PM »
Quote from: gtc link=topic=7212.msg1045937832#msg1045937832

So, you're no longer broke! :wink:


Hahahah-  on the contrary - I'm very broke - but I'm working 40hrs a week again until xmas so things are picking up and the financial pressure I was in a month or so ago has lifted for now...  I've also been selling some non car related things I had as part of a collection to pay off my credit card debt etc so the car is back on the go.

Quote from: Jethro link=topic=7212.msg1045937833#msg1045937833

Ah! The age old delima of where do I stop comes to mind.... if it wasn't for the money I'be be going for a 454 crate motor straight out of the states....:grr::grr::grr::grr::grr:


Yeah - I decided that if I'm going to keep this thing then I should do it right and do it properly so I don't have to get another one.

I know myself well enough that if I left it stock then I would have to get another one and big block it etc etc - so why not just do it to this car. As long as everything is reversable then it's no big deal and I can return it to stock if needed.

Offline Jethro

  • Camo's nemesis
  • Supercharged
  • ******
  • Posts: 1649
  • The Lone Ranger
  • Location: The Gong
  • Car: 1969 Corvette Roadster
The DEMONX 1970 vert project Pt2
« Reply #97 on: September 22, 2010, 07:26:24 PM »
Nah,

Life's to short buddy built it to what you want now!:pepper::pepper::pepper:

Offline Scott

  • Tri Powered
  • ****
  • Posts: 419
  • Shed Dweller
  • Location: Gold Coast
The DEMONX 1970 vert project Pt2
« Reply #98 on: September 23, 2010, 12:17:38 PM »
:cough: turbo small block :cough:
:drag:

My plan down the track is to fuel inject the small block for reliability and economy when cruising.  The more driveable it is, the more I'll enjoy driving it.  Then when the foot does go down... :smirk: the fun begins.

Offline 69 DIRTY RAT

  • Supercharged
  • ******
  • Posts: 1170
    • http://www.ratpackmuscle.com/
The DEMONX 1970 vert project Pt2
« Reply #99 on: September 26, 2010, 09:32:17 PM »
Quote from: demonx link=topic=7212.msg1045937831#msg1045937831
In another turn of events:

I'm getting closer to pulling the motor, I've been thinking of taking Dirty Rats advice and turning this thing into a rat rather than a mouse. I called an engineer this morning and the largest donk he'll ticket me for is a 502ci. Must be fate as I was actually thinking of a 502 before I called him.

At the moment it's a L46 with a M21 muncie 4 speed.

Im thinking of:

502 with a 4 speed semi auto (ie a auto that is full manual shift)

With the 502 I'd have to change the hood so I'd prob be looking at a L88 long hood and do away with the wiper door and grill.

I've never though about semi auto's before but the HQ ute I recently bought has a 350 chev with a full manual powerglide and it's damn fun to drive but a couple more gears would be great!

I still have several months till decision time but thats where I'm sitting at the moment..


Its about time you listen to me!!!!!:rol:

Hey as long as the big block is a low deck 9.8in it will fit! anywhere from the humble 396 up to The biggest you can go is 598cubes!!! 502 gm engines are good for there reliability and decent hp for your buck but check out Shaffiroff engines  http://www.ultrastreet.net/bigblock.asp they are good value and use good quality parts! About 10k US for a 625hp 540cuber! by the time you get it here plus postage it lands for about $12k ozzy!!!!
http://ratpackmuscle.com/ SCARY TOUGH MUSCLECARS

69 540ci, 755HP 734FtLb RAT, 629rwhp

*I LUV MY '69 ZL-1 540ci VETTE, AND SO DOES YOUR GIRLFRIEND!