Author Topic: The DEMONX 1970 vert project Pt2  (Read 68166 times)

0 Members and 3 Guests are viewing this topic.

Offline demonx

  • Fuel Injected
  • *****
  • Posts: 722
The DEMONX 1970 vert project Pt2
« Reply #60 on: February 17, 2010, 06:15:38 AM »
I'm pretty sure they do. All the prep and repair work is done at the hotrod shop and they send the pieces off to Geelong Electroplating for the chrome which is meant to be one of the best in VIC. It saves me driving down there myself and the price is still good.


Offline BOSCHVETTE

  • Tri Powered
  • ****
  • Posts: 296
The DEMONX 1970 vert project Pt2
« Reply #61 on: February 17, 2010, 07:59:25 AM »
A tip when doing your priming, tint each coat(gettin slighty lighter each coat) with the top coats colour( in your case red) it does 2 things for you when you get stone chips you dont notice them as much and you can also tell when you are rubbing it back how many coats you have rubbed through.This should stop you from rubbing through your primer.
New toy about to breath life and we will have a strangle hold on the leadfoot forever 850hp 1150kg Australian sports sedan series here we come.
Z06 sports sedan about to be semi retired.
Old C4 weapon now retired to the garage
450 RWHP WITH MORE TORQUE THAN MUNDINE
BUT IT LOOKS LIKE YOU HAVE BOUGHT A BAG OF ROCKS TO A GUN FIGHT.....

Offline demonx

  • Fuel Injected
  • *****
  • Posts: 722
The DEMONX 1970 vert project Pt2
« Reply #62 on: February 23, 2010, 05:23:01 PM »
More minor progress.

Got the door jams sanded and taped up waiting for a cooler (under 25*) day so I can shoot some epoxy, then use a bit of filler to smooth out the lines a fraction more in the inner door jam, then spray primer, base & clear.

Will be glad to see something else in color other than the damn door inners! After these jams are painted I'll have to remount the doors on the freshly rebuilt hinges (once the damn bushes and springs arrive) and then I can start a bit more body work.

Still looking for a decent rear filler panel. At this stage side pipe or stock is an option.


Offline demonx

  • Fuel Injected
  • *****
  • Posts: 722
The DEMONX 1970 vert project Pt2
« Reply #63 on: February 28, 2010, 10:35:04 AM »
Two updates for today:

1) Unfortunately I'm going through a fair financial struggle at the moment so I've had to sell the American Racing Torq Thrust II wheels I had custom made for my vette in the USA. I took a deposit on them last week and they are getting collected at some stage today. The new owner is from somewhere in Sydney I believe - no idea if they are a NSW member. Either way - these wheels and tires are as new since they've only been driven around the block twice - anyone following this thread will know this cars not been doing much driving!!!

I really didn't want to sell them and I'm kinda sad about this but such is life.


2) Today is the perfect temp to spray so I went out to the shed - I was getting ready to spend the day spraying the door jams and some other things.

I mixed this first lot of epoxy I noticed there was a swirl I could not manage to stir in, I watched it start to move around on the surface and it looked like chemicals seperating (like oil and water for eg) - this is what it looked like after a minute or so.


I'm wondering all this crap I went through with the paint blister failure (last time I painted it p#issed me off so much I've had a break till now) that it was this seperation/contamination of sorts and I never noticed it last time when mixing.

This narrows it down to either the epoxy, hardner or thinner. I seriously doubt its the thinner. I inspected the hardner lid and it had a build up of crap dried around the seal. Even though I believe it was sealed correctly it's possible that it may not have been. Also this tin of epoxy was the same tin that failed on me last time. So I'm down to these two things.

So much for finally getting motivated to spend the day in the shed spraying. Now I have to get my hands on some more hardener and epoxy (being sunday rules it out for today) and do some trial and error test samples to assess where the actual contamination is.

Offline Scott

  • Tri Powered
  • ****
  • Posts: 419
  • Shed Dweller
  • Location: Gold Coast
The DEMONX 1970 vert project Pt2
« Reply #64 on: February 28, 2010, 10:40:18 PM »
I did see your wheels on ebay. Shame you had to pass them on.  At least you caught the paint before you sprated it this time.  Would have been devastating to have another batch go crinkly.

Offline demonx

  • Fuel Injected
  • *****
  • Posts: 722
The DEMONX 1970 vert project Pt2
« Reply #65 on: March 04, 2010, 05:37:40 PM »
I just had a hour and a bit private lesson from a PPG rep.

Yeah - blew my mind.

Cause I had the paint blistering and the paint shop contacted PPG about it since I described I was following procedure correctly, I had a PPG rep from Melbourne (2 hours drive from my house) call me and make an appointment to come and check out the way I'm shooting their products and try to work out where I'm going wrong and inspect my spraying environment.

I figured it was a whole thing where they send out a rep to rip shreds through me and say it's my fault not PPG's - however it turned out to be quite the opposite.

This guy asked a million questions on my procedure
He inspected and disected my blistered parts with a razor blade

It was at this stage he told me he believed that the base color was sprayed too early and the epoxy had not had time to cure properly. I informed him I had waited 24 hours between primer and basecoat - he said sometimes you cannot go by the sheet especially when I'm not spraying in a booth etc

He then used a elecronic micron guage and apparently my 2 coats of epoxy and 2 coats of primer in the "hard to spray"parts reached up to 800 microns.

THEN: because they were way too thick he wanted to assess my prep, setup and spraying technique.

We went through all that - he told me I am "extremely finnicky" when it comes to the measurements and all that part is perfect HOWEVER when it came to spraying technique and air pressure I had a problem.

I've always set my guns at the idle pressure rather than active pressure. I've never been told or taught otherwise. So when he went to spray with my gun and setup he told me the pressure is WAY too low and we went through all of that with his fancy guages etc, THEN after all that he continued to give me a detailed spraying lesson. He even asked if he could demonstrate on my eggcrate grills and taught me how to get to the VERY difficult parts correctly (very different than the way I tackled it) and gave heaps of other tips and pointers.

I've been spraying for years - but nothing can beat having a grey haired old man who seems to have been painting since he graffitied the inside of his mothers womb give you a few pointers from his years of experience. It's all that "real world" paint shop experiance that blows away my "read it on the net and had a go at it" experience.

Anyway - long story short - Aparently there is nothing wrong with my hardner or epoxy, apparently those swirls and the weird looking photo I posted are normal for that product (got me f**ked) and I have a whole heap of new info floating around in my head to work on to try get a better spray job.

PPG tech support is the BEST I have EVER encountered.

Offline gtc

  • Supercharged
  • ******
  • Posts: 1464
  • Car: 1970 454 Manual
The DEMONX 1970 vert project Pt2
« Reply #66 on: March 04, 2010, 10:56:34 PM »
Quote from: demonx link=topic=7212.msg1045936921#msg1045936921
PPG tech support is the BEST I have EVER encountered.


Impressive support indeed, given that you aren't a big commercial customer of theirs.

Hopefully all of the tips get you sorted going forward.
It's C3 chromie for me, see? Si!

Offline demonx

  • Fuel Injected
  • *****
  • Posts: 722
The DEMONX 1970 vert project Pt2
« Reply #67 on: March 05, 2010, 08:18:41 AM »
Quote from: gtc

Impressive support indeed, given that you aren't a big commercial customer of theirs.


He actually mentioned while he was here he gets more satisfaction helping people like myself that are doing this for the love of it, rather than those just pumping out fast commercial crap jobs.

Offline craigh

  • Four Barrel
  • ***
  • Posts: 195
The DEMONX 1970 vert project Pt2
« Reply #68 on: March 07, 2010, 03:56:35 PM »
Hi

I noticed in part one of this thread you have coated headers fitted to your vette and you said they fitted better than your old ones.

What brand are they. ?

I am looking at some Hooker ones at present for my 71 SB.

Regards

Craig

Offline demonx

  • Fuel Injected
  • *****
  • Posts: 722
The DEMONX 1970 vert project Pt2
« Reply #69 on: March 07, 2010, 10:39:37 PM »
Quote from: craigh link=topic=7212.msg1045936944#msg1045936944
Hi

I noticed in part one of this thread you have coated headers fitted to your vette and you said they fitted better than your old ones.

What brand are they. ?

I am looking at some Hooker ones at present for my 71 SB.

Regards

Craig


Sorry - you must have confused my car with somone elses. The Headers on my car are rusted out and I'll prob cut them up and throw them in the recycle! They appear beyond repair.

I did have a set of chrome Hooker side pipes for my car however I hit some hard times and had to sell a lot of the parts I was not using yet - so they are gone.

Offline craigh

  • Four Barrel
  • ***
  • Posts: 195
The DEMONX 1970 vert project Pt2
« Reply #70 on: March 07, 2010, 11:14:06 PM »
I have been reading so much recently must have got my wires crossed.

Question re the wheels you just sold.

Were they 17" or 18" and did you notice much change in drive quality when you changed from the original 15"s

Offline 72vet

  • Supercharged
  • ******
  • Posts: 1676
The DEMONX 1970 vert project Pt2
« Reply #71 on: March 08, 2010, 06:47:09 AM »
Try this one craigh  

http://nswcorvettes.com.au/forum/viewthread.php?tid=6964&page=2#pid1045936922

Quote from: Scott - "My Black Vette Thread" link=topic=6964.msg1045936712#msg1045936712


The other job done was installing the ceramic coated headers.


The first side went on fine.  The second side was a bit of a pain.  I had to remove the oil dipstick and tube to get the header in place, then knock it back in when I was finished.  

The new pipes look much better than the old ones, and as a bonus, they don't hit the firewall :hammer: unlike the ones that were on there...

I'll have to try modify the exhaust a little to fit the new headers now.  And replace the cut fuel lines.


CLICK ME to see my albums.

Offline craigh

  • Four Barrel
  • ***
  • Posts: 195
The DEMONX 1970 vert project Pt2
« Reply #72 on: March 08, 2010, 07:21:55 AM »
Thanks.....that was it.

Offline demonx

  • Fuel Injected
  • *****
  • Posts: 722
The DEMONX 1970 vert project Pt2
« Reply #73 on: March 08, 2010, 09:03:21 AM »
Quote from: "craigh"

Question re the wheels you just sold.

Were they 17" or 18" and did you notice much change in drive quality when you changed from the original 15"s


They were 18 X 8 Torq Thrust II with 245/45/18 rubber.

I cannot answer about how they drove as my car is not on the road and the wheels only ever took two short trips around the block while I was bleeding out the brakes.

Apart from that and reversing in and out of the shed I've never driven this car and thats always been on the old rallies with dryrot tires. It's rather depressing to have a car sitting there for years and not drive it!

I have heard and read however that going up to 17's or 18's makes for much better handling.

Offline demonx

  • Fuel Injected
  • *****
  • Posts: 722
The DEMONX 1970 vert project Pt2
« Reply #74 on: March 23, 2010, 01:31:27 PM »
Been a while since I posted.

My thoughts have since changed on SODA BLASTING...

Here in this first shot you can see after I sealed the fibreglass with epoxy that its completely f**cked... Pitted and looks like elephant skin.


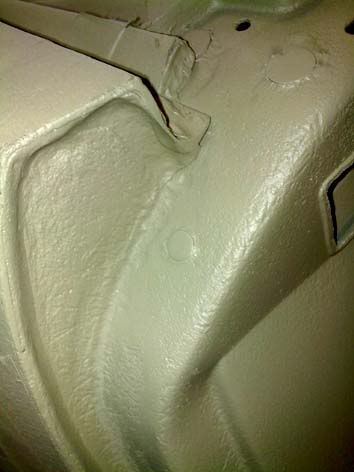
When it was in bare fibreglass you cannot see how bad it is until its covered in something. Everywhere in the door jams was like this as the guy must have "over" blasted the area trying to be throrough and not knowing the mess he was making.

Lots of sanding - then using PPG filler (especially for fibreglass) and then lots more sanding I had this:


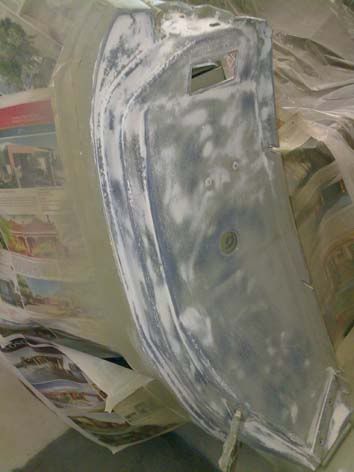
After respraying the epoxy (it has to be covered by itself if not covered with aomething else within 8hrs) I then shot some PPG prima primer, scuffed that back with 600 grit and today I shot some base and clear.


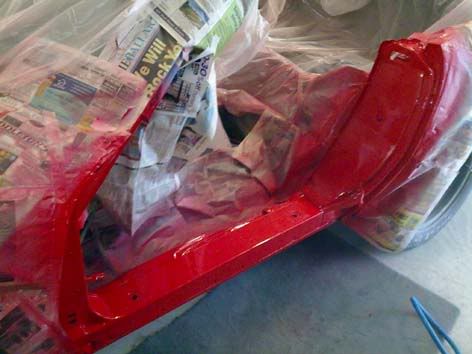
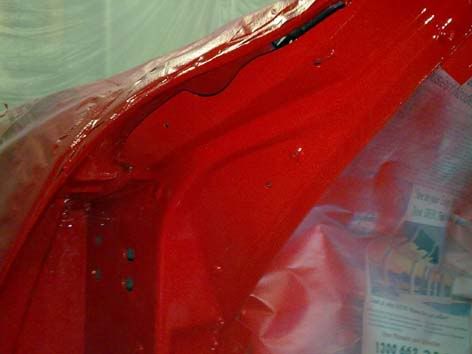
This area I spent a hell of a lot of time on as from the factory it is mega ugly and mine was completely screwed up and filled with silicone and filler and all sorts of crap (previous posts might explain my hassles)

Anyway - I reckon I got it close to the pic I posted early as my "inspiration" pic.


I've finished rebuilding the hinges as the new pins, bushes and springs arrived the other day. They look pretty good, just have to hunt down some lithium grease on my way to work this arvo so I can lube up the rollers before bolting them back onto the car.

Offline demonx

  • Fuel Injected
  • *****
  • Posts: 722
The DEMONX 1970 vert project Pt2
« Reply #75 on: April 01, 2010, 06:10:27 PM »
Nothing exciting to report, just some more slow progress pics.

Inside the rear compartment sprayed with epoxy - in an hour or so I'll spray the primer over it. Then over the long weekend I'll get some red onto the hinges and into the rear astro vent ducts and then satin black around the upper edge of the compartment and an all the metal sections then sound deadner (Kahguard - first time I've used it) around the rest of the rear compartment.


And a shot of my extra lighting to help see into the dark corners!
 

Offline demonx

  • Fuel Injected
  • *****
  • Posts: 722
The DEMONX 1970 vert project Pt2
« Reply #76 on: April 01, 2010, 08:32:56 PM »
In primer:


New Chrome arrived!

not the best pic - I tried a few angles but could not get a good photo with my mobile. Considering the condition I handed them over in I reckon they came back pretty damn good!


Offline demonx

  • Fuel Injected
  • *****
  • Posts: 722
The DEMONX 1970 vert project Pt2
« Reply #77 on: April 02, 2010, 01:29:25 PM »
Bare minimum painting today. Just needed to get some red on the hinges so i can let them dry overnight and mask them off tomorrow to paint the black around them.


Offline demonx

  • Fuel Injected
  • *****
  • Posts: 722
The DEMONX 1970 vert project Pt2
« Reply #78 on: April 05, 2010, 02:56:26 PM »
Finished off the rear compartment this weekend.

All the metal parts were sprayed with black and cleared with satin. Then I masked off all those parts and sprayed the rest with Kahguard. First time I've used it and I was quite impressed.

Looks much better in person than in the pics. It's a shame I have to cover it all up!


I went a bit further back than factory on the hinge colour, but in my opinion having the black part way up then colour just doesnt look right so I took the red all the way back to the hinge.


Offline demonx

  • Fuel Injected
  • *****
  • Posts: 722
The DEMONX 1970 vert project Pt2
« Reply #79 on: July 21, 2010, 12:03:53 AM »
Been a while since I posted.

I've had a fair rest from the old beast and it's time I got stuck back into it, especially after seeing some of the other awesome work guys are doing on the forums... Makes me feel lazy!

A couple weeks ago I spent a weekend reshaping the rear taillight surrounds and the rear spoiler and trying to finish off the body work there.

Also Been working on the rear filler panel gaps. Thought I was finished but bit more work to be done.

Heres a coule pics of one of the door gaps (they were pretty bad) and I'm happy with the end result. Only gotta do that three more times!