Author Topic: The DEMONX 1970 vert project Pt2  (Read 66344 times)

0 Members and 1 Guest are viewing this topic.

Offline Jethro

  • Camo's nemesis
  • Supercharged
  • ******
  • Posts: 1649
  • The Lone Ranger
  • Location: The Gong
  • Car: 1969 Corvette Roadster
The DEMONX 1970 vert project Pt2
« Reply #120 on: October 03, 2010, 10:46:42 AM »
Quote from: demonx link=topic=7212.msg1045937905#msg1045937905
I've had two black cars and I would not think twice of having another. In fact when the vette's finished (one day) I'll be cutting the rust from my HQ ute and painting that black.

As far as there being too many Red cars - yeah - but mine will be Viper Red! It'll stand out in the crowd!


I'm sure it will buddy, can't wait to see the colour on it:pepper::pepper:

Offline 69 DIRTY RAT

  • Supercharged
  • ******
  • Posts: 1170
    • http://www.ratpackmuscle.com/
The DEMONX 1970 vert project Pt2
« Reply #121 on: October 03, 2010, 04:16:32 PM »
mmmmmmmmmmmmmm.....black:drool::drool::drool::drool::drool::drool::drool::drool: oh and a smiggen of off white:drag::drag::drag::drag::drag::rol::rol::rol:
http://ratpackmuscle.com/ SCARY TOUGH MUSCLECARS

69 540ci, 755HP 734FtLb RAT, 629rwhp

*I LUV MY '69 ZL-1 540ci VETTE, AND SO DOES YOUR GIRLFRIEND!                   

Offline gtc

  • Supercharged
  • ******
  • Posts: 1464
  • Car: 1970 454 Manual
The DEMONX 1970 vert project Pt2
« Reply #122 on: October 04, 2010, 12:18:17 AM »
Quote from: 69 DIRTY RAT link=topic=7212.msg1045937907#msg1045937907
mmmmmmmmmmmmmm.....black oh and a smiggen of off white


Yeah, like this:


:lmao: :lmao: :lmao: :pat: :beer:
It's C3 chromie for me, see? Si!

Offline Jethro

  • Camo's nemesis
  • Supercharged
  • ******
  • Posts: 1649
  • The Lone Ranger
  • Location: The Gong
  • Car: 1969 Corvette Roadster
The DEMONX 1970 vert project Pt2
« Reply #123 on: October 04, 2010, 10:36:08 AM »
Quote from: gtc link=topic=7212.msg1045937909#msg1045937909
Quote from: 69 DIRTY RAT link=topic=7212.msg1045937907#msg1045937907
mmmmmmmmmmmmmm.....black oh and a smiggen of off white


Yeah, like this:


:lmao: :lmao: :lmao: :pat: :beer:


:rol::rol::rol::rol::rol::rol::rol::rol::rol::rol::rol:

Offline 69 DIRTY RAT

  • Supercharged
  • ******
  • Posts: 1170
    • http://www.ratpackmuscle.com/
The DEMONX 1970 vert project Pt2
« Reply #124 on: October 04, 2010, 07:45:46 PM »
Yes Im STINKIN FAST!!!!!!!
http://ratpackmuscle.com/ SCARY TOUGH MUSCLECARS

69 540ci, 755HP 734FtLb RAT, 629rwhp

*I LUV MY '69 ZL-1 540ci VETTE, AND SO DOES YOUR GIRLFRIEND!                   

Offline demonx

  • Fuel Injected
  • *****
  • Posts: 722
The DEMONX 1970 vert project Pt2
« Reply #125 on: October 10, 2010, 03:31:15 PM »
Hopefully next time I post pics this thing will have red on it, but the update for now is I've been slack and taken a week off, however today I have finished fixing up a few pinholes I missed and the rear is 600 sanded! Time to clean the shed, remask and shoot color.

This pic is my second attempt to fill the pinholes here and this time it was successful.
First time I rubbed it back and used filler but for some reason when I sanded it back there were still some pinholes, so this time I mixed up a small amount of primer and used only a tiny bit of thinner so it'd stay reasonably think like high fill. I dabbed the primer into the pinholes and let it cure for a couple hours before sanding back and this time they're gone for good.

Much easier than messing around with filler and it means I don't have to respray primer over the top again as it's the same thing.


Offline demonx

  • Fuel Injected
  • *****
  • Posts: 722
The DEMONX 1970 vert project Pt2
« Reply #126 on: October 11, 2010, 12:14:44 PM »
http://tinyurl.com/2fy6q5z

After 2 Coats of clear... 2 more to go. It's flashing off between coats as I type.


I was thinking of being lazy and not sand/cut & polishing the clear, but my first coat of clear I got a run thats about 8" long, so now I have no choice. For my second coat I bumped up the air pressure a tiny bit to help eliminate any more runs.

Offline demonx

  • Fuel Injected
  • *****
  • Posts: 722
The DEMONX 1970 vert project Pt2
« Reply #127 on: October 11, 2010, 01:43:20 PM »
And 4 coats of clear:


Offline gtc

  • Supercharged
  • ******
  • Posts: 1464
  • Car: 1970 454 Manual
The DEMONX 1970 vert project Pt2
« Reply #128 on: October 11, 2010, 01:46:20 PM »
Quote from: demonx link=topic=7212.msg1045937951#msg1045937951

(I tried to add a youtube box, but the forums spellcheck eliminates any swearwords and the random code given to my video by youtube starts with the letters s h i t !!! Great, they're evaluating my car for me before it's even finished!


LOL!

Here's the YouTube link using a tinyurl:

http://tinyurl.com/2fy6q5z

Quote
After 2 Coats of clear... 2 more to go. It's flashing off between coats as I type.


You're in the home straight now.  :pepper:
It's C3 chromie for me, see? Si!

Offline Jethro

  • Camo's nemesis
  • Supercharged
  • ******
  • Posts: 1649
  • The Lone Ranger
  • Location: The Gong
  • Car: 1969 Corvette Roadster
The DEMONX 1970 vert project Pt2
« Reply #129 on: October 11, 2010, 06:38:34 PM »
Quote from: demonx link=topic=7212.msg1045937952#msg1045937952
And 4 coats of clear:


WHHOOOOOWHHHOOOOOOO!!:luv::luv::luv::luv:

Offline MADLT1

  • Supercharged
  • ******
  • Posts: 1121
The DEMONX 1970 vert project Pt2
« Reply #130 on: October 11, 2010, 08:55:58 PM »
looking good:bannana::bannana::bannana::bannana:

Offline demonx

  • Fuel Injected
  • *****
  • Posts: 722
The DEMONX 1970 vert project Pt2
« Reply #131 on: October 16, 2010, 12:05:46 PM »
Had a bit of a drama last night (cause everything else always goes perfect!)

I started to cut the clear back to 2000 to get rid of the peel and the run that I had in the clear. Turns out the run had etched itself into the red base coat so I had to rub back into the color. Not happy.

Last night I tried to do a blend in by just sanding back the surrounding surface and spraying new base and clear but when I inspected this morning I wsn't happy with the outcome, so this time I'm trying the same thing but with a bit of primer underneath to help match the rest of the panel.

I'm hoping this time it'll work and be invisable so I wont have to restrip the whole quarterand start again.

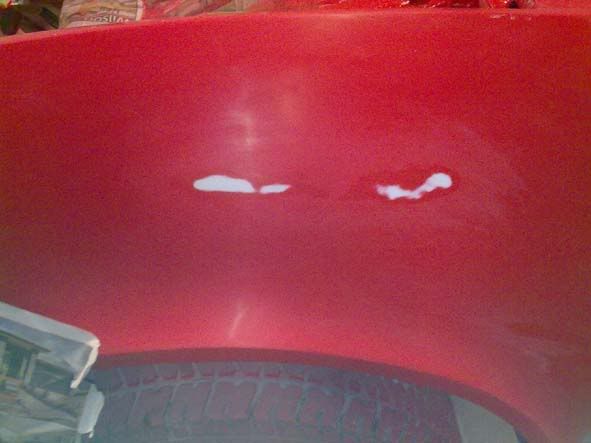
The initail rub to remove the drip etching


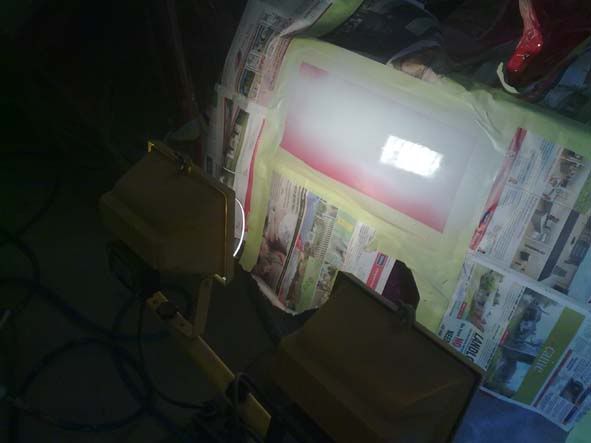
This is the second attempt - this time masked off for primer overspray (will unmask for the color and clear and blend them out then cut it back to 2000 to match the rest of the panel )


Primer under a heat lamp


Hopefully I'll be able to sand this patch in a few hours and get the color on. Fingers crossed!

Offline demonx

  • Fuel Injected
  • *****
  • Posts: 722
The DEMONX 1970 vert project Pt2
« Reply #132 on: October 16, 2010, 04:39:29 PM »
Tried and failed twice now. It's still noticable - just.

Going to have to sand back and respray the whole panel.

Offline Jethro

  • Camo's nemesis
  • Supercharged
  • ******
  • Posts: 1649
  • The Lone Ranger
  • Location: The Gong
  • Car: 1969 Corvette Roadster
The DEMONX 1970 vert project Pt2
« Reply #133 on: October 16, 2010, 05:15:08 PM »
Quote from: demonx link=topic=7212.msg1045938006#msg1045938006
Tried and failed twice now. It's still noticable - just.

Going to have to sand back and respray the whole panel.[/rquote

Bummer!:grr::grr::grr::grr:

Offline demonx

  • Fuel Injected
  • *****
  • Posts: 722
The DEMONX 1970 vert project Pt2
« Reply #134 on: October 17, 2010, 02:16:39 PM »
Had another crack at it today - it looks better. My heat lamp blew both globes so its hard to see in the shed light if I actually fixed it this time or not. I can kinda just so very slightly see an outline but I'm hoping it's not going to be highlighted with the clear (wishful thinking as clear highlights everything)

This is the primer section before I rubbed it back. I was meant to blend in the edges but I got a bit trigger happy.


This is the best I can get it without respraying the whole lot. For now it'll have to do as this is the third time I've had a go at fixing it.

Offline Jethro

  • Camo's nemesis
  • Supercharged
  • ******
  • Posts: 1649
  • The Lone Ranger
  • Location: The Gong
  • Car: 1969 Corvette Roadster
The DEMONX 1970 vert project Pt2
« Reply #135 on: October 17, 2010, 04:54:58 PM »
looks good:pepper::pepper::pepper:

Offline wabco40

  • Fuel Injected
  • *****
  • Posts: 556
  • Location: Perth
The DEMONX 1970 vert project Pt2
« Reply #136 on: October 21, 2010, 01:41:43 PM »
Quote from: demonx link=topic=7212.msg1045936665#msg1045936665
Spent a bit of time yesterday and today messing around with the inner skin of the drivers door.

Heres a few pics:

Epoxy - 2 coats


Primer - 3 coats


I sanded the primer back with 320 and then 600 ready for color and then decided I wasn't going to be happy with the appearence of the factory seams etc, so I then used PPG A661 PE Stopper (A filler specific for fibreglass body work) to neaten up the messy factory look.


I then reprimed and sanded back to 600 before shooting the PPG Viper Red - 3 coats
The color doesnt turn out real great in this mobile phone pic. I'll have to take some more in sunlight once the paints cured


Waited an hour after the last layer of red and masked off the black section, shot 2 layers of PPG Black and 3 layers of PPG 800 clear with a mattening agent in it so the black area will have a satin look.


Tomorrow I'll unmask this and tape off the black area to shoot 3 coats of 800 gloss over the red.


Hello Demonx, Your door looks good. I did the same with my doors and filled the gap between the skin and steel frame. Also filled the spot weld divets on the frame to smooth things out. I have left the inside of my doors body colour and also painted the hinge bolt covers body colour. I am not sure how is is going to look until I get the doors back on!!! I may end up doing what you have done and paint it satin black.

Its good to see you have cleaned up the forward jamb area. It makes a big difference in appearance from the standard factory bonding adhesive mess.
Brad.

Offline demonx

  • Fuel Injected
  • *****
  • Posts: 722
The DEMONX 1970 vert project Pt2
« Reply #137 on: November 02, 2010, 09:32:17 AM »
Only update  I can add is that I have the ability to destroy everything I touch!

Yesterday I finished the 2000 sand of the quarter I repaired. ( I had to respray another section on the same quarter last weekend) - It came up pretty good and you cannot see the repair at all. Completely blends in at every angle I stand, even when I get right up close I cannot see the merger.

I then commenced to wash the entire rear with water to remove dust and then polish it with a 3M polish called "Perfect it" which the paint shop told me was the best they have.

My waffle pad was a bit old so I bought a new one and went with the 3M pad reccomended on the tub of polish which turns out to be a bit more abrasive than the old one I was used to.

Somehow due to my lack of polishing experience I managed to polish through a couple of edges back to the primer which on a bright red car stands out like dogs balls and I think I may have slightly damaged the clear in a couple spots.

In a nut shell: After the polish it looks great in the majority but some areas it looks crap.

I guess unless I respray it's now a "looks great from 1 meter away" paint job.

Add another "Not happy" to my painting thread!

Offline Jethro

  • Camo's nemesis
  • Supercharged
  • ******
  • Posts: 1649
  • The Lone Ranger
  • Location: The Gong
  • Car: 1969 Corvette Roadster
The DEMONX 1970 vert project Pt2
« Reply #138 on: November 02, 2010, 10:03:37 AM »
Demnox,

:grr::grr::grr::grr::grr::grr: But just think of the up side by the time you finish this paint job you'll have it down pat!


Offline wabco40

  • Fuel Injected
  • *****
  • Posts: 556
  • Location: Perth
The DEMONX 1970 vert project Pt2
« Reply #139 on: November 02, 2010, 10:00:27 PM »
Quote from: demonx link=topic=7212.msg1045938182#msg1045938182
Only update  I can add is that I have the ability to destroy everything I touch!

Yesterday I finished the 2000 sand of the quarter I repaired. ( I had to respray another section on the same quarter last weekend) - It came up pretty good and you cannot see the repair at all. Completely blends in at every angle I stand, even when I get right up close I cannot see the merger.

I then commenced to wash the entire rear with water to remove dust and then polish it with a 3M polish called "Perfect it" which the paint shop told me was the best they have.

My waffle pad was a bit old so I bought a new one and went with the 3M pad reccomended on the tub of polish which turns out to be a bit more abrasive than the old one I was used to.

Somehow due to my lack of polishing experience I managed to polish through a couple of edges back to the primer which on a bright red car stands out like dogs balls and I think I may have slightly damaged the clear in a couple spots.

In a nut shell: After the polish it looks great in the majority but some areas it looks crap.

I guess unless I respray it's now a "looks great from 1 meter away" paint job.

Add another "Not happy" to my painting thread!


Sorry to hear about the trouble your having with your paint job.
Where abouts did you cut through to the primer?